Invoicing for G Suite
Automate tasks like invoicing, tracking your time and sending reminders
- Are you looking for an easy way to track your working hours?
- Do you want to wow your clients with professional looking PDF invoices?
- Do you want to get paid faster?
- Do you want to include your work details in the invoice?
- Do you like to see which invoices are still outstanding and which have already been paid?
- Do you want to customize your invoices and the outgoing emails to match your CI?
- Do you want all data to be stored in Google Sheets?
If you can answer at least one of these questions with Yes, then the application Invoicing for G Suite is just right for you!
Get your free copy of Invoicing for G Suite to your Google Drive.
Setup
Make it yours!
Your copy of this Ultradox application includes all programs and templates so that you can either use it out-of-the-box or use it as a starting point to make it yours.
Before you start tracking times and sending out invoices, you may want to enter your company info and your clients into the Invoicing sheet.
If you want to allow your clients to pay right from the email, you’ll also have to connect the app to your stripe account.

Only enter your data into the prepared cells! Changing the structure of the sheets will break the app - unless you know exactly what you are doing.
Invoicing Google Sheet
The Invoicing spreadsheet contains all the relevant data needed to create the invoices.
Worksheets Info, Customer
Please enter your company data and customer data in the Info and Customers worksheet and delete the existing example entries.
When entering the language, country and currency of your clients, please use the correct codes: ISO 3166-1 alpha-2
The application contains English and German templates. Learn how to add another language here.
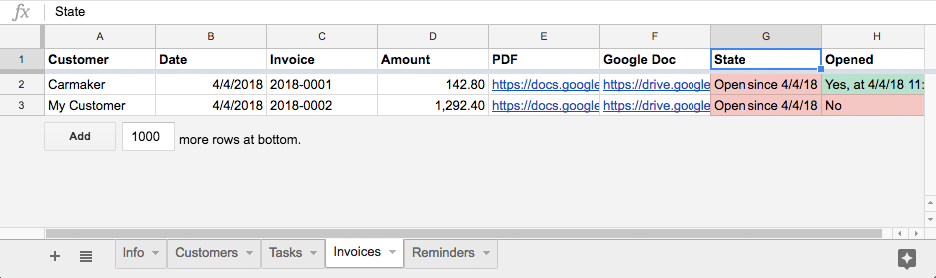
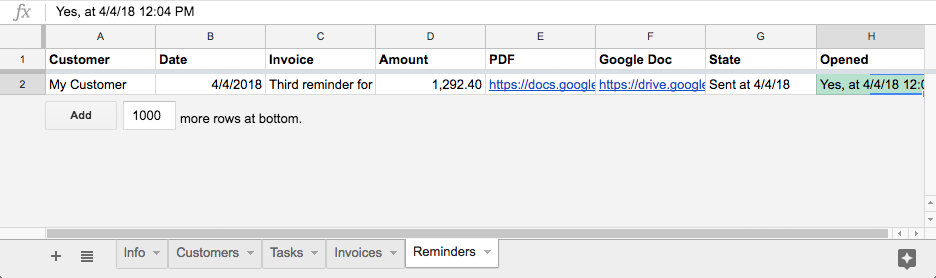
Worksheets Tasks, Invoices, Reminders
Ultradox automatically enters all relevant entries in the Tasks, Invoices and Reminders worksheets as soon as you use the Task tracker and Create invoice app.
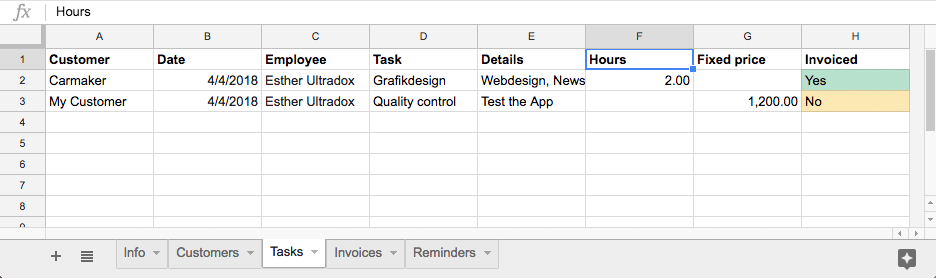
Of course, you can also enter and adjust the tasks manually in the corresponding worksheet. However, the Task tracker will help you to avoid typos.
Activate credit card payment
To enable your customers to pay your invoice right from the email, link the Pay invoice app with your stripe account.
If you do not have a stripe account, you can easily set up a test account here.
When you open the Pay invoice app for the very first time, a dialog will pop up and will help you to authorize the app to access your stripe account.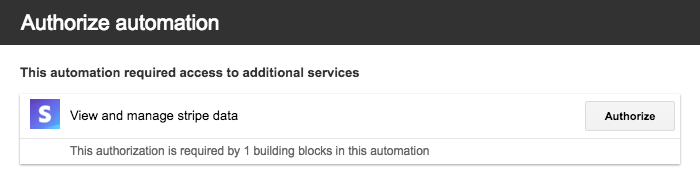
If you have cancelled this process by accident and want to start the authorization once again, just click on the red key icon in the payment request building block.

Confirm that you want to run this block using your account and then grant access to your stripe account.
Link the automation to your stripe account by copying the secret key into the corresponding field in the authorization window.
Then open the Google Invoicing spreadsheet and copy the publishable key to the Infos worksheet.
You are now ready to accept credit card payments with your stripe account.

Your customers can now make payments right from the email both on desktop and mobile devices
Activate reminders
To send automatic reminders, first adjust the number of days after which the corresponding emails are to be sent in the Invoicing spreadsheet.
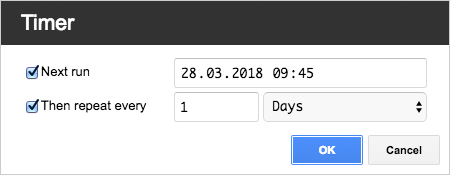
Then open the Send reminder automation and activate the Timer in the Ultradox Editor to execute this automation once a day.
To do this, click the Timer button in the main toolbar or select the Timer item in the Run menu.
The app is now ready to go!
All necessary steps for the preparation are completed and the app can be executed.
However, if you wish, you can adapt the invoice template and the email template to your corporate design before using the app.
Invoice template
The template Invoice Template is the template for your invoices. In the folders en and de, you will find an English and a German version.
Adapt the template you require to your corporate design, but do not change the variables so that the data can be generated automatically from the Invoicing sheet.
If you want to insert additional variables and need help with the available formatting options, please check out the Ultradox Template Editor.
If necessary, create new folders with the relevant country codes and an invoice and e-mail template. To retain the functionality, the names of the Invoice Template and Email Template templates must remain in the folders. Just change the text and get the variables.
Folder Invoices
In this folder you will find all archived invoices sorted by year.
You can either archive the invoices as a PDF document only or additionally save a Google Doc to be able to edit the invoices in the future.
Email template
The outgoing email is generated from this template. The email contains various text sections that will be used depending on whether an invoice or a reminder is sent.
You can adapt the texts and the design to match your corporate design.
Reminder: In order to keep the functionality it is necessary to keep all variables in the Invoice Template and in the Email Template.
You can also add further elements to your email if, for example, you want to send your customers additional information like a survey whenever they receive an invoice.
Using the Ultradox Email Designer to add additional elements to the template will ensure that they will play nicely on all devices.
Usage
Task tracking and invoicing
After you have completed the setup and entered all relevant data into the sheet, you can start tracking tasks and sending out nice invoices to your clients.
You may have already opened the apps right after the copy process.
You can open and run the apps at any time by opening the red Ultradox files right from Google Drive and starting them via Run App in the main toolbar of the Ultradox editor.
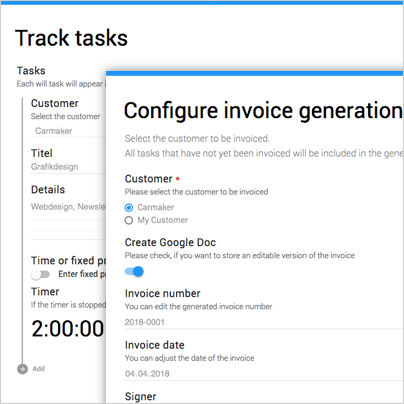
Task tracker
Enter tasks either with a fixed price or track your working hours using a built-in stopwatch.
The name of the employee who enters the tasks is automatically saved and will appear on the invoice.
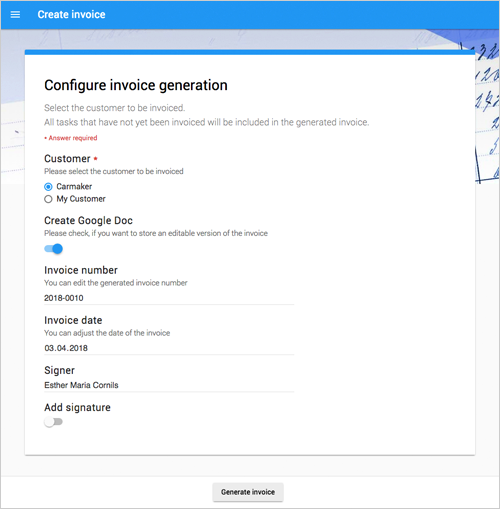
Create invoice
After you have entered your tasks, you can create and send the invoice for a selected customer.
Tip: Create a bookmark after launching the app
Pay invoices and create reminders
The Pay invoice and the Send reminder automations will run in the background so you do not have to run them manually.
Make sure that you have setup the Pay invoice and Send reminder apps properly as described in the setup section
Pay invoice
When using the Create invoice app, Ultradox automatically generates and sends the invoice with all tasks that have not yet been billed to the selected client.
Your clients can then pay the invoice right from the email by credit card.
Send reminders
This automation automatically sends reminders for due invoices and only becomes active if you have set daily execution as described in the setup section.
Activate Live Mode
If you have copied Invoicing for G Suite to your Google Drive, the app is in test mode.
This means that all outgoing emails are sent to you and will not be sent to your customers.
This is ideal for familiarizing yourself with the application and testing the invoicing.
When you are ready to send the invoices, open the files Create invoice and Send reminder from Google Drive.
Switch them to live mode with the Test/Live button.
The background of the canvas changes from green to white.

Customize
Invoicing for G Suite can be used out-of-the-box. However, you can also customize to match the needs of your company.
You get the full source code of the application so you can adjust and customize every single aspect!
Let’s have a look at a bunch of simple customizations:
Changing the subject of the email
Open the Create invoice file from Google Drive. This file contains the automation for creating and sending the invoice.
At the end of the automation you will find the building block Send HTML Email... which will send the invoice is to your customers.
Click on the bold text /$/{company}: ... to edit the subject of the e-mail.

Change the format of the invoice numbers
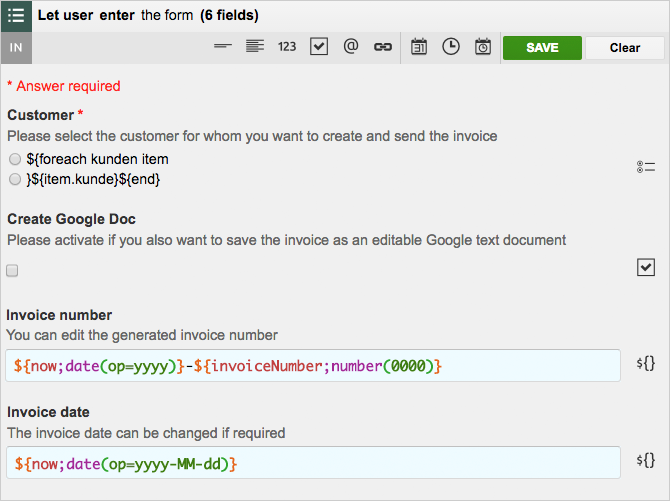
You can edit the invoice number when creating an invoice.
To change the proposed invoice number format, open the building block that says Let user enter the form... by clicking the form icon in the top-left corner.
In the Invoice number field, you can see how the proposed invoice number is constructed.
You can freely adapt the format using all Ultradox formatting capabilities.
Reset invoice number
The invoice numbers are automatically incremented for each invoice.
To set the counter to a specific value, click on the button with the number symbol.

Enter the desired value in the dialog.
Adding another language
If you need invoice and email templates in a different language, create a new folder named with the corresponding country code.
Now create a copy of the Invoice Template and Email Template templates from the folder de or en and move them to the new folder. The names of the templates must be retained.
When entering the language, country and currency of your clients, please use the correct codes: ISO 3166-1 alpha-2
Questions and Feedback
If you have any comments on this page, feel free to add suggestions right to the Google document that we are using to create this site.
If you are not yet member of the Ultradox community on Google+, please join now to get updates from our end or to provide feedback, bug reports or discuss with other users.
Last Updated: 12/20/18