Master the table question type
Take full advantage of the most sophisticated form field type
The table question type is the most advanced form field type. It may take some time to set it up correctly, but it is worth it!
Topics
- Add a table field to your form
- Create a table with different column types
- Enter data to create rows and columns
- Create a dynamic table from rows in a sheet
Prerequisites
- You already know how to add Ultradox Forms to your flow and deal with basic question types
Goals
- You will be able to leverage all features of the table field type
Instructions
In this case, we create a small simple online shop where your customers can order the products with quantity and so on.
Create form
To create the form, drag a Form building block from the User Interaction of the sidebar into your document and open the Form dialog by clicking on the bold parts in the title of the newly added form building block.
You can then drag and drop a table field from the sidebar into the form.
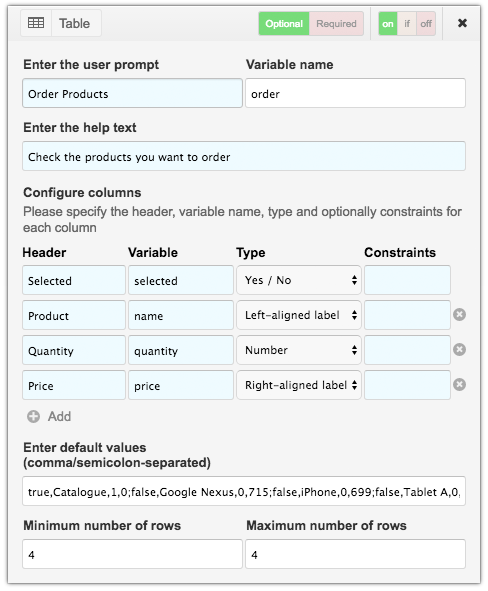
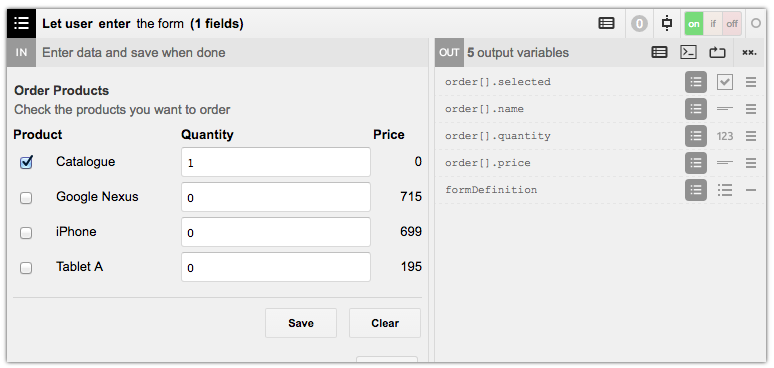
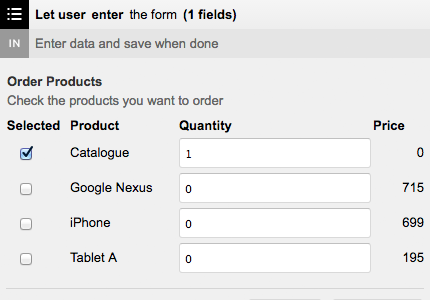
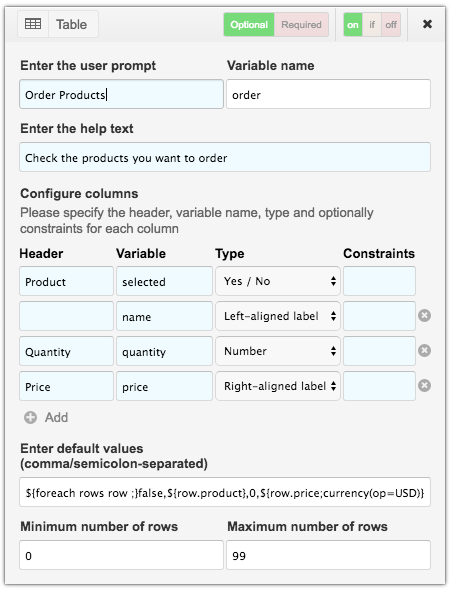
Add a Table field from Selections and enter the prompt Order Products, the Variable name order and a help text.
Defining Columns
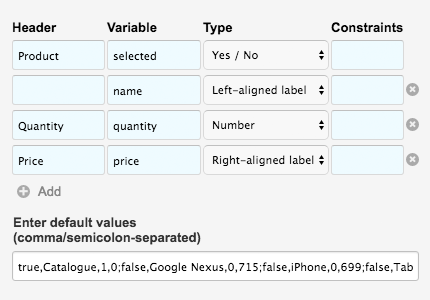
Configure the structure of the table to define the appropriate format for your online shop. Enter the Headers of the columns and specify the variable names, display Type, and the Constraints for each heading.
Please note that the columns of the resulting table are arranged in rows in this input dialog for the configuration.
Header
For each column, you can specify a heading that is displayed above the column.
In our example: Selected, Product, Quantity, Price.
Variable
You can specify a variable name for each column. Use simple variable names to keep your templates simple.
The table field will produce a list of variables as output.
If you have chosen products as name for the table field you will find these variables in the output section of your form:
order[].selected
order[].name
order[].quantity
order[].price
Type
You can set a display type for each heading and column. The column with the heading Selection receives a checkbox (Yes / No), the number of a number field (number) and the price is displayed as right-justified text.
Simply select the desired type from the drop-down list.
You fill find a list of available column types in the reference section of this guide.
Constraints
Some field types like LIST can be configured using the constraints field.
The constraints have to be entered in valid JSON format. You will find various tools to validate your JSON.
To specify the possible options for a list, you'll have to specify the name which will be displayed to the user and the id that will be stored in your variable.
As an example we specify two possible choices that will show up as Priority delivery and Standard for the user and will either store fast or slow in the products[].delivery variable.
{
"options": [
{ "name": "Priority delivery",
"id": "fast"
},
{
"name": "Standard",
"id": "slow"
}]
}
Contents of the table
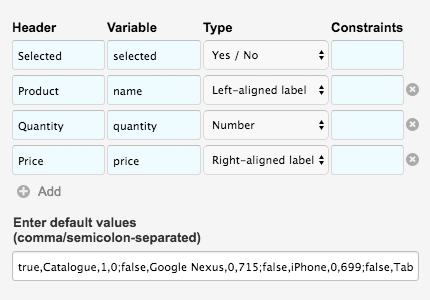
You have now defined how the table should look like, now you can enter the contents in your table. Use the input field for the standard values.
Here you can enter the values for the columns of the resulting table. In our case this would be for the first line selection (Yes/No), catalogue, quantity and price.
Since the appropriate value is entered for each column for the display type, our line looks as follows:
true,Catalogue,1,0
true,Catalogue,1,0;
In the first line we offer a catalogue which is selected (true), requested once (1) and is free (0)
Separate columns by commas and rows by semicolons and do not use spaces. For our example, you can insert the following:
true,Catalogue,1,0;false,Google Nexus,0,715;false,iPhone,0,699;false,Tablet A,0,195
Please note that the columns of the resulting table are arranged in rows in this input dialog for the configuration.
Minimum and maximum
Finally, limit our table to 4 lines by entering 4 at minimum and maximum.
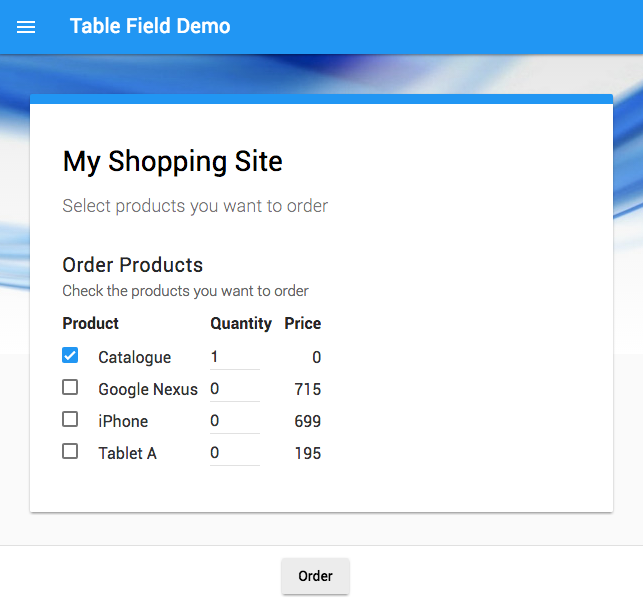
Click Apply to close the form editor. The table should now appear in your form.
Configure user interaction
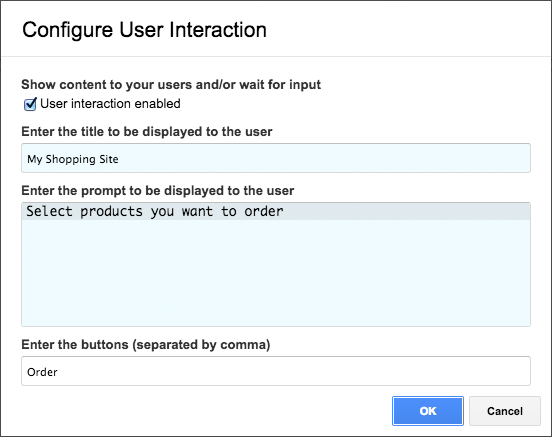
Finally, adjust the user interaction to display a message to your customer after completing the form. To do this, click on the user interaction icon in the title of the module form to open the dialog.
Enter title, prompt and the button Order.
Improve table layout

If you leave the header blank for one of your columns, the header of the previous column will extend over the following columns. For our improved layout, the Product heading now extends over the first two columns and the checkbox for selection is integrated in the list of articles.
Dynamic tables
What makes Ultradox forms unique is that you can use your previously loaded data to construct the table. So let's link our Ultradox Automation to a stock list of products that are in stock and should be offered in our small online shop. So you can easily list the articles in a Google spreadsheet document and don't have to enter them in the Table field of the Form Building Block.
Creating an inventory list
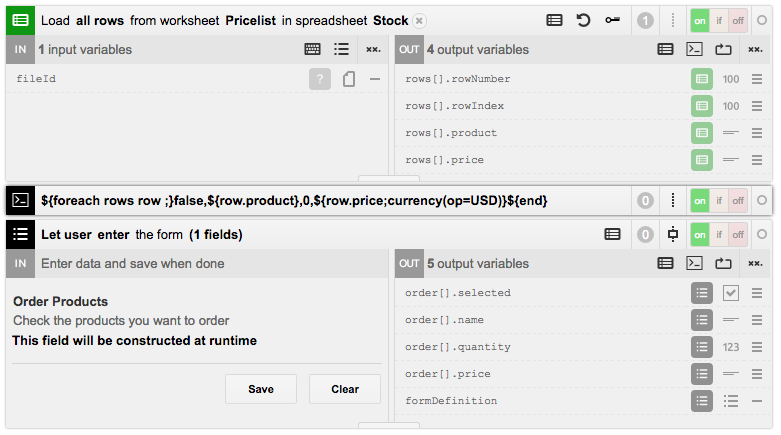
To see how this works, we add a Load worksheet building block from the Google Sheets category above our Form building block and select Create in the file picker dialog. Ultradox will then open a new Google spreadsheet document in a new browser tab.
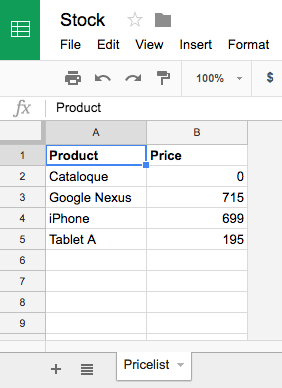
Rename the file to Inventory, rename the worksheet to Pricelist and create two columns for the products in column A and the price in column B.
It is best to delete all other columns so that only columns A and B remain, because Ultradox generates variables per column.
Enter our products Catalog, Google Nexus, iPhone and Tablet A and the respective prices.
Switch back to the Ultradox tab and update the Load Worksheet building block so that the new columns will be detected.
Ultradox now displays all generated variables in the output variables section:
rows[].rowNumber
rows[].rowIndex
rows[].product
rows[].price
Load table data into the form
Click on the bold text in the title of the Form building block to open the Form Editor again.
We are now changing the default values of our form so that the input of the stock is constructed from the variables in our inventory.
To do this, we need to create a foreach loop with ; as a separator instead of the commas. Enter the following in the default values:
${foreach rows row ;}false,,0,${row.price;currency(op=USD)}${end}
In addition, we change the minimum in 0 and maximum in 99 to list more than 4 items.
Click Apply to save the settings.
Log statement

To check which values Ultradox transfers to our list, we add a Log statement building block from the Core components of the sidebar directly after the Load worksheet building block.
As a comment, enter the same statement that we have inserted in the default values of the form:
${foreach rows row ;}false,,0,${row.price;currency(op=USD)}${end}
If you now run Ultradox Automation and open the console of the Ultradox editor, the following should have been displayed:
false,Cataloque,0,$0.00;false,Google Nexus,0,$715.00;false,iPhone,0,$699.00;false,Tablet A,0,$195.00
Ultradox has created the same line as we did in our first simple online shop.
We can conveniently enter our inventory in a list and do not have to enter it in the standard values of the form editor.
Try it[a]
Let's enable user interaction for the form to see if everything works as expected.
If you enable your flow as an App and hit the run button you will see how the table will be rendered to the user of your app.
The entered data will be collected and will be available in subsequent steps of your flow.
Column Type Reference
The following table shows the available column types:
| Name |
Description |
| |
Displays the given value as centered text, no editing possible |
| |
Displays the given value as plain text, left aligned |
| |
Displays the given value as plain text, right aligned |
| |
Shows a simple text field populated with the given value |
| |
Displays a checkbox. Shows up selected if the given value is |
| |
Shows a number field with the given value as default |
| |
Shows a date input with date picker if supported by your browser |
| |
Shows a time input with date picker if supported by your browser |
| |
Displays the given values as list |
[a]How To Wrap Text on Table??
Questions and Feedback
If you have any comments on this page, feel free to add suggestions right to the Google document that we are using to create this site.
If you are not yet member of the Ultradox community on Google+, please join now to get updates from our end or to provide feedback, bug reports or discuss with other users.
Last Updated: 11.08.24