Doc Builder
Doc Builder can save hours of typing in financial reports, technical support, customer care, legal documents and more.
Organize your frequently used text snippets in folders on Google Drive for instant access.
You can even add Smart Snippets that launch an interactive mini app right in the sidebar to generate snippets on the fly based on your input.
Doc Builder can also auto-format your snippets when inserting them into the document based on themes defined in a Google Sheet.
Installation
Install the Doc Builder Add-on
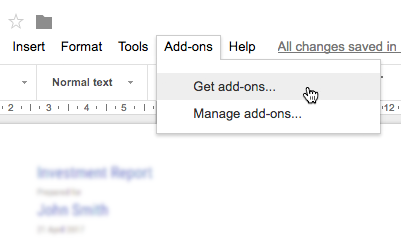
Install the addon by clicking on the Add-ons menu in Google Docs and searching for the Doc Builder add-on in the list of available add-ons.
The Doc Builder will then be installed and a dedicated menu will appear in the Add-ons menu.
You can then launch the add-on from the Add-ons menu in Google Docs by clicking on Open sidebar in the Doc Builder submenu.
Snippets
Inserting snippets
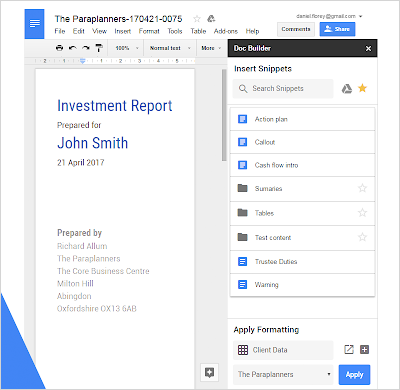
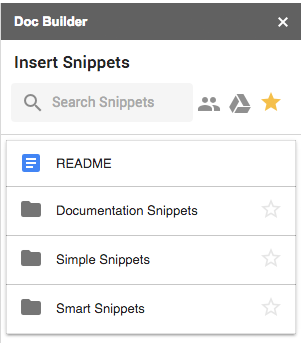
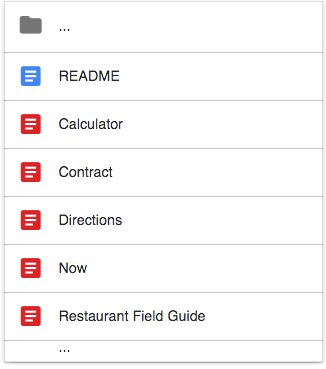
In the sidebar you will find a number of snippets and folders. When opening the Doc Builder for the first time in a new document you will find a collection of demo snippets to help you getting started.
To insert a snippet into your document just place the cursor at the position in your document where you want to insert the snippet and click on the snippet in the sidebar.
The snippet will then be inserted into your existing document. All formatting options will be preserved - unless you pick one of the themes in the formatting section.
Organizing snippets
Snippets are just plain old Google Documents and can be organized in folders on Google Drive.
To create your own collection of reusable text snippets simply create a dedicated Google Documents for each snippet.
You can organize your snippets in folders on Google Drive. The sidebar will reflect the folder structure on your Google Drive and will give you quick access to the files and folders.
Browsing My Drive
Click on the Google Drive icon in the toolbar to jump to your Google Drive root directory. All Google Docs and folders will show up and you can browse to the files you want to insert.
Starred folder
To avoid navigating to the folder that contains your snippets each time you open the Doc Builder you can set the folder as starred folder by clicking on the star on the right of the folder name.
The star icon in the toolbar will become active and you can jump to the starred folder by simply clicking on that button.
To unstar the folder or to select a different starred folder jump to your Google Drive root directory and navigate to the starred folder manually. You can then just unstar the folder by clicking on the star icon again.
Starring a different folder will also unstar the previously starred folder automatically.
Formatting
Themes
Themes are a great way to reuse the same text snippets in various documents.
Let's say you are working on documents for different clients and want them to match your client's corporate identity. Doc Builder allows you to create different themes for each client that can then be automatically applied when inserting snippets.
Auto-formatting snippets
When inserting a snippet you can either keep the original formatting by picking None in the themes dropdown. Or you can select a theme to apply the theme specific formatting when inserting the snippet.
When opening the Doc Builder for the first time in a new document you will find a number of predefined themes to choose from.
Format document
You can change the formatting of your document with a single click by just picking the desired theme and clicking on the blue Apply button.
Format selection
You can also apply the theme by selecting a section in your document, picking the desired theme and clicking on the blue Apply button.
The selected section will be formatted according to the selected theme.
Creating themes
Themes are specified in a Google Sheet. You can open and inspect the sheet containing the default themes by clicking on the open icon on the right of the sheet picker box.
To create your own set of themes click on the plus icon. A new sheet will be created on your Google Drive containing a copy of the default themes.
The first column contains the name of the theme as it will appear in the dropdown box in the sidebar.
The remaining columns contain the formatting rules for the different headings, normal text etc.
Just format your cells in the same way as you want them to appear in your document.
Smart Snippets
Smart Snippets show up with a red icon instead of the blue Google Docs icon.
Clicking on a red snippet will launch a mini app right in the Doc Builder sidebar and can create text or formatted snippets on the fly.
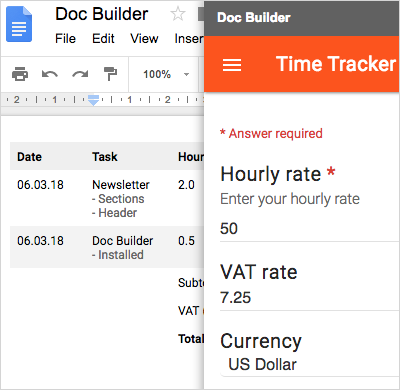
Smart Snippets can be as simple as the Calculator example that will just evaluate an expression and insert the result at the cursor position.
But they can also be very sophisticated and collect data using multiple interactive steps, perform calculations and more, like in the Time Tracker example.
Creating Smart Snippets
Smart Snippets are Ultradox apps running right in the Doc Builder sidebar. Just like regular Ultradox apps you can create multiple interactive steps, access external services and more.
The app then creates plain text or a Google Doc that will then be inserted at the cursor position.
Only apps that do not require login can be used as Smart Snippets
Text Snippets
Smart Snippets that create plain unformatted text as output will run very fast and are the right choice if you want to insert inline text at the cursor position.
Think of the calculator example, a formatted date or if you want to lookup some data to insert it right at the cursor position.
Creating a smart text snippet requires, that the last building block of your flow is an Output Parameter block that defines an output variable called snippetText.
The content of the snippetText variable will then be inserted at the cursor position.
Now
Let's have a look at the simplest possible Smart Snippet. It will just print the current date and time at the cursor position:
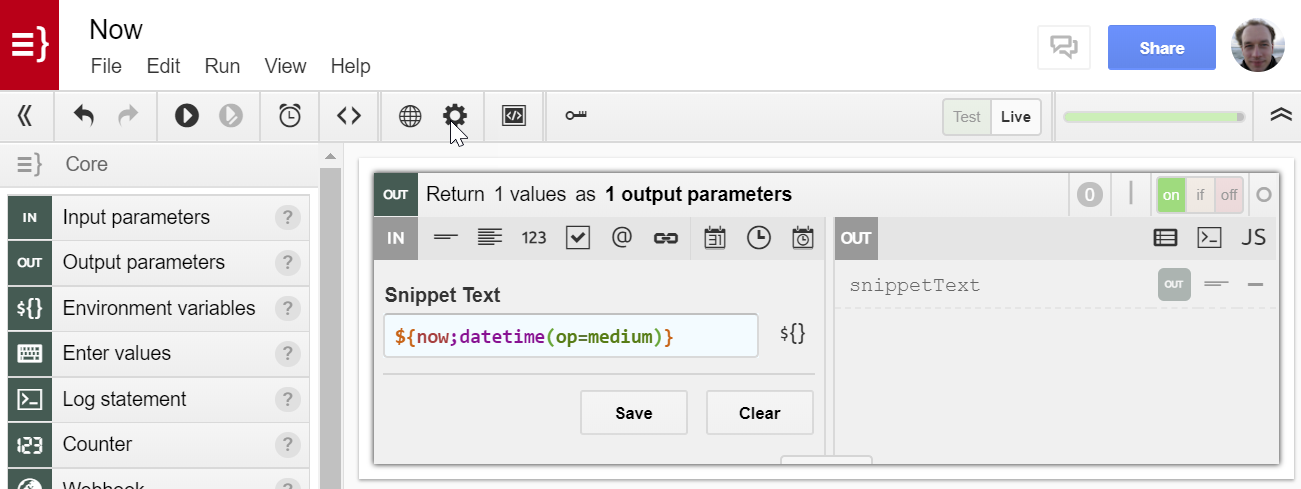
Just toggle the snippetText to template mode by clicking on the icon on the right of the text field so that it gets a blue background. Now enter ${now;datetime(op=medium)} which will print the current date and time in a medium long format and hit Save.
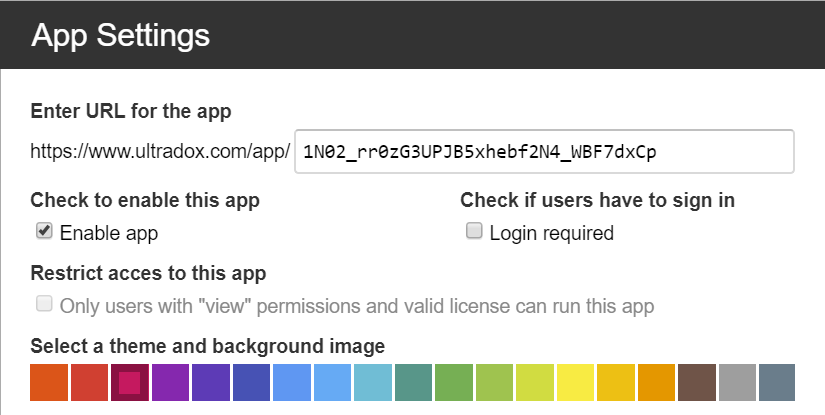
Enable your app by clicking on App Settings in the Ultradox editor and make sure that login is not required.
That's it!
Your first Smart Snippet is ready to use. Just select it using the Doc Builder to insert the current date and time at the cursor position.
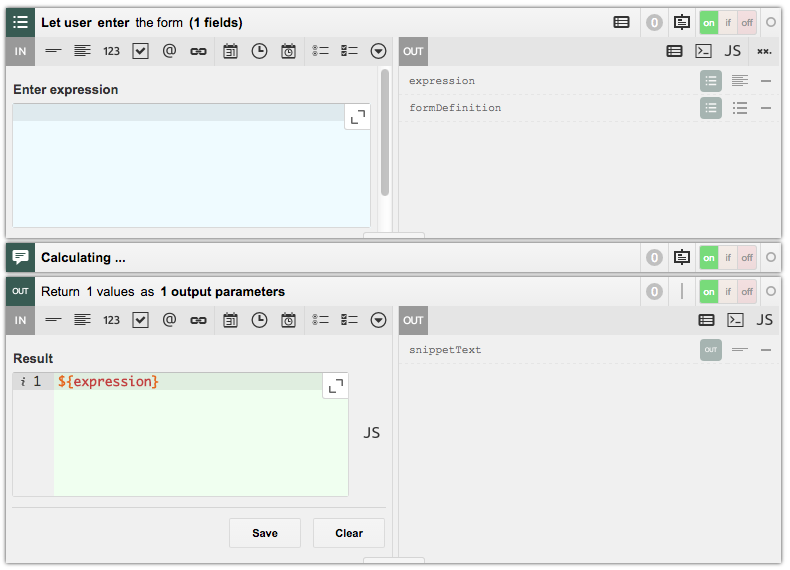
Calculator
The calculator that you'll find in the collection of demo snippets is a bit more complex, but still fairly simple: It just asks the user for an expression, then shows a notification and inserts the evaluated expression into the document:
Google Docs Snippets
Smart Snippets creating a formatted Google Doc to be inserted are much more powerful, but they are also a more tricky to implement.
Why is that? They have to create a temporary Google Doc on your Drive, wait until the generated document has been inserted into the main document and then delete the file from drive.
Let's have a look at the contract example which generates an agreement header by merging the entered data in a Google Doc template.

The last building block is an Output Parameter block that defines two output variables called snippetFileId and onSnippetInserted.
The snippetFileId has to provide the ID of the file to be inserted. As we have uploaded our merged Google Doc to Google Drive and the Upload building block provides the fileId as output parameter, we can simply use this variable to populate this output parameter.
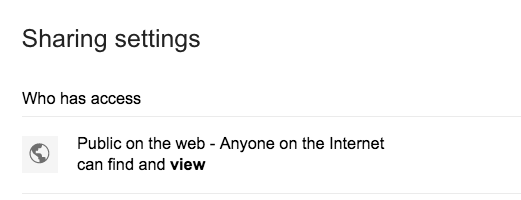
Upload your generated Google Doc to a folder that anyone on the Internet can find and view.
The sharing settings are important so that users of your Smart Snippet can access the generated file in order to insert it into the document they are working on.
The second output parameter takes an URL that will be called once the generated snippet has been inserted into the document.
We will use the URL of the current flow and pass the fileId as parameter so that we can delete the generated file after it has been inserted.
Assign the following expression to the onSnippetInserted variable:
https://www.ultradox.com/runAsync/${_internal.publicKey}?fileId=${fileId}The first blocks of the flow will only be executed if the fileId is present. This can be achieved by using an If block with the following advanced condition:
'${fileId}'.length > 0You can use this example as a template for your own advanced Smart Snippets. Put the logic of your app into the else part of the condition.
The contract example just asks for values to be entered using a Form, then displays a Notification to the user and merges the values into a Googe Doc.
Make sure to create a Google Doc (do not create PDF, Word or LibreOffice documents) so that it can be inserted using Doc Builder.
Doc Builder Pro
Doc Builder Pro adds some nice features and improved performance to Doc Builder.
We have reserved computing resources for the Pro users on the Google Cloud to allow faster file browsing and snippet insertion.
If you have just upgraded your plan please make sure to re-open the sidebar to load the Pro version.
The header of the sidebar should now say "Pro" instead of "Free".
Create Snippets
You can create new snippets on the fly by simply selecting a region in the Google Doc you are working on and then clicking on the new snippet icon.
A new snippet will be created in the folder you are currently in. It contains just the part of the document that has been selected.
A new blue Google Docs file icon will appear in the list of files. Open the newly created snippet in a new tab by clicking on the open icon on the right of the file name.
Create Folders
Create a new folder in the current folder by clicking on the new folder icon. A dialog will pop up that allows you to specify the name of the folder.
Folders will greatly help you to organize your snippets.
Variables
With variables (also known as merge codes) you can replace variables with theme-specific values. This allows you to insert and personalize snippets in one go.
This is by far the fastest approach to generate personalized documents based on values in your themes sheet.
Creating variables is simple. Just add the name of the variable into the header row of your themes sheet and enter the value for the variable in each theme row.
You will find a few example variables in the demo Themes sheet.
Important: Variables may have any names but must not contain a = sign.
You can then use these variables in your snippets by enclosing the variable name with .
Let's say you want to add a new variables called customer that shall be replaced with the actual customer name from each theme, just enter customer into the header row and then use it in your snippet like this:
Dear ${customer}
We have good news for you.
When inserting the snippet into your document, the variable will be replaced with the value from the row of the selected theme.
The free version of Doc Builder allows you to define up to 3 different variables, the Pro version does not have any limitations on the number of variables.
Merging documents
If you are working on a document that contains variables you can run a merge for all themes right from Doc Builder (Pro version only).
Just click on the merge icon on the right of the selected themes sheet in the Formatting & Variables section at the bottom and enter a name for the folder that will contain your merged documents.
If you want to create a document from various snippets that contain variables, please make sure to insert the snippets without selecting a theme. This will keep the variables intact and will not replace them with the values from a theme.
You can give it a try by selecting Keep snippet styles and inserting the Invoice snippet from the variables folder found in the demo snippets (click on the Home button to go to the demo snippets).
You can then click on the merge button to create a personalized document for each theme found in your selected themes sheet.
Advanced formatting capabilities
Doc Builder Pro allows you leverage advanced formatting directives:
-
TYPEwhich allow you to apply styles based on the element type (e.g. only apply a background color toTABLE_CELL) -
INallows you to apply styles to all element within the given container (e.g. all text inside theTABLE_OF_CONTENTS)
Questions and Feedback
If you have any comments on this page, feel free to add suggestions right to the Google document that we are using to create this site.
If you are not yet member of the Ultradox community on Google+, please join now to get updates from our end or to provide feedback, bug reports or discuss with other users.
Last Updated: 05.04.23